Carrier Operations – Introduction
Carrier Operations are what make naval aviators naval aviators: Landing a 30k pound, supersonic fighter jet on a carrier deck requires good awareness of ones relation to the boat at all times, and a lot of finesse on throttle and stick, getting that perfect angle of attack to make the hook snap that perfect 3 wire.
“Hold up” you say, what’s an “angle of attack” and what’s a “3 wire”?
Generally, there are always 4 cables (or “wires”) on the stern (rear end) of the aircraft carrier – your goal is to always, and I mean always, catch the 3rd one. That is the 2nd to last. Obviously, at the end of the day any landing you can walk away from is a good one in your mind, but carrier landings are graded. Furthermore, catch the 1st one and you might’ve just survived a ramp strike, so number 3 it is. OK? OK!
The procedures for Carrier Ops generally vary depending on visibility (weather conditions and time of day), ranging from CASE 1 to CASE 3, from good to bad. CASE 2 is a mix of CASE 1 and CASE 3.
Arrival
Not depending on visibility is the arrival in carrier controlled airspace, which is basically a circle around the aircraft carrier with a radius of 50nm. Since we are talking about a circle and not a bubble, there is no altitude in life you could fly to not be in carrier controlled airspace within that circle.
Upon arrival, flight lead should contact “Marshall Control” to check in.
Marshall is looking for the following info:
You however now know for certain what type of approach you’re in for and when to commence (Charlie Time).
CASE 1 – good visibility (5nm visibility @ minimum 3.000ft ceiling)
Holding Pattern
So you have been marshalled into the holding pattern with some info provided by Marshall. It would be a good idea to set up some things in your aircraft while flying towards it:
Usually you enter the pattern at 2.000ft, but if that one is full or you find yourself in a slower aircraft you may need to fly at 3.000 or 4.000ft. Once your flight is in the pattern make sure of the following while checking deck operations and waiting for Charlie Time:
Breaking The Deck
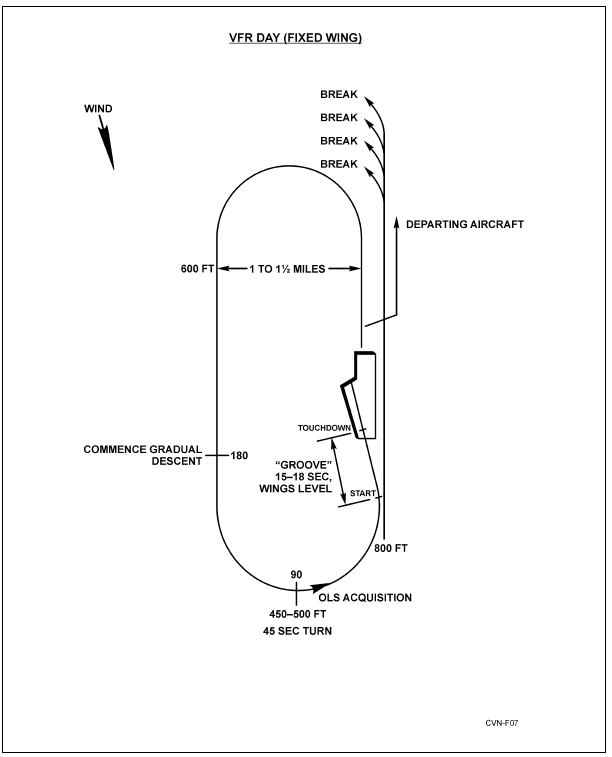
Breaking The Deck describes the phase of flight when you leave the Holding Pattern to descent from abeam of the ship to the “initial” in preparation for the landing pattern.
Landing Pattern
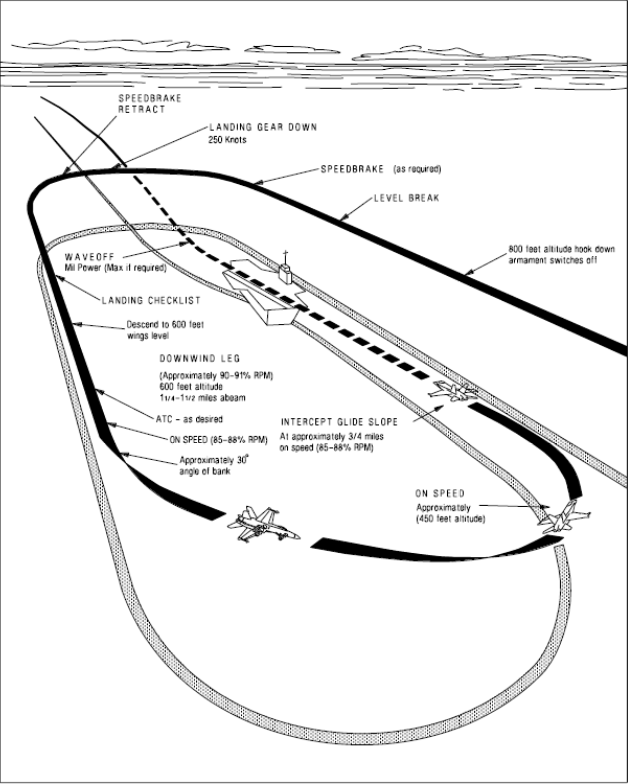
After intercepting initial 3nm away from the ship you fly BRC at 350kts / 800ft and aim to end up slightly offset to the starboard of the carrier, so that when you glance out of your left window you should be able to see if the deck will be ready for your approach.
When passing the overhead, flight lead will break to the left, with other flight members following in around 10 second intervals.
Breaks can be conducted within a maximum distance of 4nm to the bow of the ship.
The goal of the Break is to establish proper speed and distance to the boat for the downwind, around 1.0-1.5nm abeam of the ship, ideally about 1.2nm when directly abeam. Spacing for individual flight members should eventually be 45seconds on touchdown.
To perform a break properly, it is required to pull ca 1% of the indicated airspeed in
G-Force, that means under normal conditions when you start to break at 350kts, you initially pull 3.5G and gradually loosen up as you slow down.
Key data for the Break:
Not depending on visibility is the arrival in carrier controlled airspace, which is basically a circle around the aircraft carrier with a radius of 50nm. Since we are talking about a circle and not a bubble, there is no altitude in life you could fly to not be in carrier controlled airspace within that circle.
Upon arrival, flight lead should contact “Marshall Control” to check in.
Marshall is looking for the following info:
- Position in relation to the carrier
- Altitude
- Fuel State (especially if low!)
- Number of Aircraft in Flight
- Type of approach requested (might be decline)
- Other information that might affect landing such as NAV aid status or a missing HUD, hung stores or weather
You however now know for certain what type of approach you’re in for and when to commence (Charlie Time).
CASE 1 – good visibility (5nm visibility @ minimum 3.000ft ceiling)
Holding Pattern
So you have been marshalled into the holding pattern with some info provided by Marshall. It would be a good idea to set up some things in your aircraft while flying towards it:
- Base Recovery Course, or BRC, of the ship (the ship’s course) on TACAN
- The Altimeter (if not set already)
Usually you enter the pattern at 2.000ft, but if that one is full or you find yourself in a slower aircraft you may need to fly at 3.000 or 4.000ft. Once your flight is in the pattern make sure of the following while checking deck operations and waiting for Charlie Time:
- Speed is 250kts
- Radar Altitude Warning set as desired (SOP is 370ft for the Landing)
- Hook Bypass switch is set to Carrier
- Anti-Skid is Off
- You are with your assigned flight
- The deck is getting cleared before proceeding to breaking the deck
Breaking The Deck
Breaking The Deck describes the phase of flight when you leave the Holding Pattern to descent from abeam of the ship to the “initial” in preparation for the landing pattern.
- Make sure you are abeam of the carrier before breaking the deck
- Descent to 800ft
- Accelerate to 350kts
- Extend the hook
- Intercept initial at 3nm astern of the carrier
Landing Pattern
After intercepting initial 3nm away from the ship you fly BRC at 350kts / 800ft and aim to end up slightly offset to the starboard of the carrier, so that when you glance out of your left window you should be able to see if the deck will be ready for your approach.
When passing the overhead, flight lead will break to the left, with other flight members following in around 10 second intervals.
Breaks can be conducted within a maximum distance of 4nm to the bow of the ship.
The goal of the Break is to establish proper speed and distance to the boat for the downwind, around 1.0-1.5nm abeam of the ship, ideally about 1.2nm when directly abeam. Spacing for individual flight members should eventually be 45seconds on touchdown.
To perform a break properly, it is required to pull ca 1% of the indicated airspeed in
G-Force, that means under normal conditions when you start to break at 350kts, you initially pull 3.5G and gradually loosen up as you slow down.
Key data for the Break:
- 1% of IAS in G
- Speedbrake as required
- Gear out / Flaps Full when slower than 250kts
- Wings level after 180 degrees
- Downwind is 600ft
1.0-1.5nm mile abeam
Once downwind is established the Hornet is trimmed “on speed”, meaning you can disregard the IAS to a degree and trim the aircraft to line up the e-bracket with the velocity for a “donut” on the AoA-Indexer, setting you up for a perfectly smooth ride all the way down to the deck.
Arriving “at the 180” with the landing checklist complete, this position is confirmed by glancing out the window and seeing the Rolldown at the rear end of the ship. At this point a left hand turn is initiated at ca 30degrees Angle of Bank, flying through “the 90” and across the wake to enter the groove, making the ball call to the LSO at 3/4nm inbound. The LSO will help guiding the aircraft down to the deck, or call a wave off if the approach is off. Again, some key data for the turn and landing to keep an eye on:
Arriving “at the 180” with the landing checklist complete, this position is confirmed by glancing out the window and seeing the Rolldown at the rear end of the ship. At this point a left hand turn is initiated at ca 30degrees Angle of Bank, flying through “the 90” and across the wake to enter the groove, making the ball call to the LSO at 3/4nm inbound. The LSO will help guiding the aircraft down to the deck, or call a wave off if the approach is off. Again, some key data for the turn and landing to keep an eye on:
- Turn left at ca 30 degree AoB at the 180
- Pass the 90 at 450-500ft AGL
- Cross the wake at around 370ft AGL
- Call the ball at 3/4nm if you see it, otherwise call “Clara”
- Ball call is short and sweet and should include flight number and fuel state only, for example:
“403, Hornet, Ball, 3.8” when fuel state is around 3.800lbs (rounded to nearest 100lbs) - LSO is your friend, more than that, he is your guiding hand: Trust him!
- On touchdown throttle to full mil (afterburners if required)
Bolters, Wave-Offs and the Spin Pattern
Alright, you made it to the deck, adjusted the throttle to full mil and are anticipating a violent pull from the wire to bring you to a halt. But what’s that? Aircraft keeps shooting over the deck and all over sudden the realization kicks in that there’s no way for the aircraft to stop because no wire was caught. That’s the exact reason we push our throttles to full mil upon touchdown, so that we have enough airspeed left to get airborne again, especially since there is a lot of factors influencing a successful trap (like AoA, ball position and descent rate).
Coming off the angled deck again, it’s time to climb back to pattern altitude (600ft), adjust to the boats BRC and wait for your interval to enter the landing pattern again.
In case the landing pattern is full (maximum of 6 aircraft at a time) you will be ordered to enter the Spin Pattern. This relatively frowned upon pattern is flown at 1.200ft with a maximum distance not greater than 3nm. From that pattern, you need to find a place in the interval of the landing pattern again in order to re-enter.
Regardless of the pattern assigned after a Bolter, you will always establish a climb before turning to the carriers BRC, and you will always climb on the bow of the ship flying the general direction of the BRC, and always descent when flying opposite of BRC. After establishing proper downwind, you fly the 180 and come in for another approach.
The LSO has the power to give you, the pilot, a Wave-Off at any moment during your time in the groove. Keep in mind that the LSO is not doing so to annoy or anger you, but because he is worried about your safety and the safety of the sailors on board of the aircraft carrier. Heck, he might be worried about his own safety as well.
Whatever the reason for the Wave-Off may be, the procedures that follow from there do not differ from the ones described further above in this section, with the difference that you never touched the flight deck.
Summary of the different stages during CASE 1
Holding Pattern
Breaking The Deck
The Overhead Break
The Downwind
The 180, the 90 and entering the Groove
Ball Flying
Bolters / Wave-Offs
Alright, you made it to the deck, adjusted the throttle to full mil and are anticipating a violent pull from the wire to bring you to a halt. But what’s that? Aircraft keeps shooting over the deck and all over sudden the realization kicks in that there’s no way for the aircraft to stop because no wire was caught. That’s the exact reason we push our throttles to full mil upon touchdown, so that we have enough airspeed left to get airborne again, especially since there is a lot of factors influencing a successful trap (like AoA, ball position and descent rate).
Coming off the angled deck again, it’s time to climb back to pattern altitude (600ft), adjust to the boats BRC and wait for your interval to enter the landing pattern again.
In case the landing pattern is full (maximum of 6 aircraft at a time) you will be ordered to enter the Spin Pattern. This relatively frowned upon pattern is flown at 1.200ft with a maximum distance not greater than 3nm. From that pattern, you need to find a place in the interval of the landing pattern again in order to re-enter.
Regardless of the pattern assigned after a Bolter, you will always establish a climb before turning to the carriers BRC, and you will always climb on the bow of the ship flying the general direction of the BRC, and always descent when flying opposite of BRC. After establishing proper downwind, you fly the 180 and come in for another approach.
The LSO has the power to give you, the pilot, a Wave-Off at any moment during your time in the groove. Keep in mind that the LSO is not doing so to annoy or anger you, but because he is worried about your safety and the safety of the sailors on board of the aircraft carrier. Heck, he might be worried about his own safety as well.
Whatever the reason for the Wave-Off may be, the procedures that follow from there do not differ from the ones described further above in this section, with the difference that you never touched the flight deck.
Summary of the different stages during CASE 1
Holding Pattern
- Maximum 5nm distance when abeam
- At assigned altitude (more often than not 2.000ft)
- IAS around 250kts
- Radar Altimeter Warning (hard deck) should be set to 370ft
- Anti-Skid is OFF
- Hook Bypass is set to CARRIER
- Check for flight members / like aircrafts and form up
- Check flight deck operations
- Anticipate to be abeam for breaking the deck at assigned Charlie Time
Breaking The Deck
- Break when abeam of the ship and the rolldown becoming visible
- Extend / Lower the Tail Hook
- Descent to 800ft
- Accelerate to 350kts
- Extending the turn a bit helps with catching the Initial properly
- Hit the initial at 350kts/800ft 3nm abeam of the ship flying BRC
The Overhead Break
- Fly Overhead, slight offset to starboard side at 350kts/800ft
- Upon passing the carrier, flight lead breaks left, flight members follow
- Interval for flight members ca 10 seconds (highly dynamic)
- keep in mind that touch down interval should be 45seconds - No Breaks beyond 4nm
- Pull ca 1% of airspeed in G
- Gear Down / Flaps down when slowing through 250kts
- Establish downwind 1.0-1.5nm (perfect abeam for F/A-18C is 1.2nm)
The Downwind
- Descent to 600ft
- Establish AoA speed
- Pitch Trim accordingly
- Landing Checklist completed at the 180
The 180, the 90 and entering the Groove
- Start the turn when seeing the Rolldown of the boat
- Turn left with 30degrees Angle of Bank
- At the 90, desired altitude is around 450ft
- Entering the Groove (crossing ships wake) should be at 370ft – RDR Altimeter (Hard Deck) Warning should trigger
- Aim for time in the Groove spend at around 15-18 seconds
Ball Flying
- Call “Ball” 3/4nm inbound, if no ball visible call “Clara”
- call as follows: Board Number, Hornet, Ball, Fuel State rounded to the nearest 100lbs, e. g.
“403, Hornet, Ball, 3.2” - Keep ball centered between Datum Lights (green row of lights on the IFOLS)
- Establish clean descent, primarily using throttle for altitude corrections and stick for speed corrections
- Initially aiming the Velocity Vector at the Crotch of the carrier helps with line-up, but should never be the main focus of the pilot, main focus is AoA and Ball combined with descent rate
- Fly the Ball all the way down to touchdown
- Listen to LSO signals
- Adjust throttle to full mil / AB if required
- In case of trap
- wait for your aircraft to come to a halt before throttling down
- switch off Exterior Lights
- retract Tailhook
- clear deck ASAP - In case of Bolter:
- make sure airspeed is high enough to lift off at the end of the angled deck
Bolters / Wave-Offs
- Establish climb to assigned Pattern’s Altitude
- Landing Pattern: 600ft
- Spin Pattern: 1.200ft - Turn to carriers BRC when climb established
- Work your way back into the Landing Pattern according to your interval
- Climbs always on around carriers BRC / to the bow of the carrier
- Descents always opposite of BRC / flying towards stern of the ship
